After my post on the long-standing services in my homelab, a few people asked how I handle remote access without having a public IPv4 address. So here is a breakdown of the setup I use.
For a typical home lab, remote access usually breaks down into three needs:
- Exposing an internal service to the internet (like self-hosted RSSHub);
- Connecting external devices back into the home LAN to access internal services and machines;
- Maintaining BitTorrent / private tracker (PT) connectability and upload speed.
The standard workarounds each have their pain points:
- FRP reverse proxy: Not a direct peer-to-peer connection; bandwidth is bottlenecked by whatever cheap VPS you are relaying through.
- IPv6: Requires the client network to have IPv6 as well, but many corporate and coffee-shop Wi-Fi networks still don’t offer it.
- ZeroTier / Tailscale: Can sometimes fail to punch NAT directly, falling back to sluggish relays.
- None of them solve BitTorrent seeding behind CGNAT.
I have been running this setup for about two years now. It has been rock solid—practically as good as having a real public IPv4.
Prerequisites
- Your ISP broadband NAT must be NAT1 (Full Cone NAT);
- PPPoE dial-up handled by your router, ideally running OpenWrt (other Linux distributions work, but you won’t be able to copy-paste my homework directly);
- At least one machine on your LAN capable of running Clash (running it on the main router works too).
Key Benefits
- No relay VPS needed; your connections saturate your full home upload speed.
- Doesn’t strictly depend on external IPv6 support (though having native IPv6 is a nice plus).
- Completely solves BitTorrent / PT seeding.
If your network satisfies the prerequisites, read on.
Network Topology
Here is the minimal topology and IP assignment of my home network for reference:
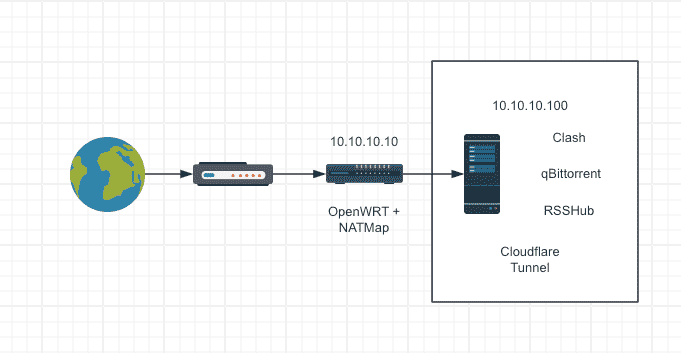
Scenario 1: Exposing an Internal Service to the Web
I run an internal RSSHub instance that external feed readers need to pull from.
For this use case, Cloudflare Tunnel is the simplest answer. Running cloudflared inside Docker per the official docs gave me zero headaches. If you ever hit edge connectivity issues, experiment with the transport protocol: try HTTP/2 over IPv4, HTTP/2 over IPv6, QUIC over IPv4, or QUIC over IPv6.
Sample configuration:
# $HOME/.cloudflared/config.yml
protocol: http2 # Available values: auto, http2, quic
# edge-ip-version: "6" # Available values: auto, 4, 6
Scenario 2: Connecting External Devices Back Home
Here I pair Clash Meta inbound listeners with NATMap. Dynamically mapped public IPs and ports are posted to a small helper service on Vercel, which turns them into a Clash subscription feed for external client devices.
1. Configure .home Domain Resolution on the Router
1.1 Assign Static IPs via DHCP
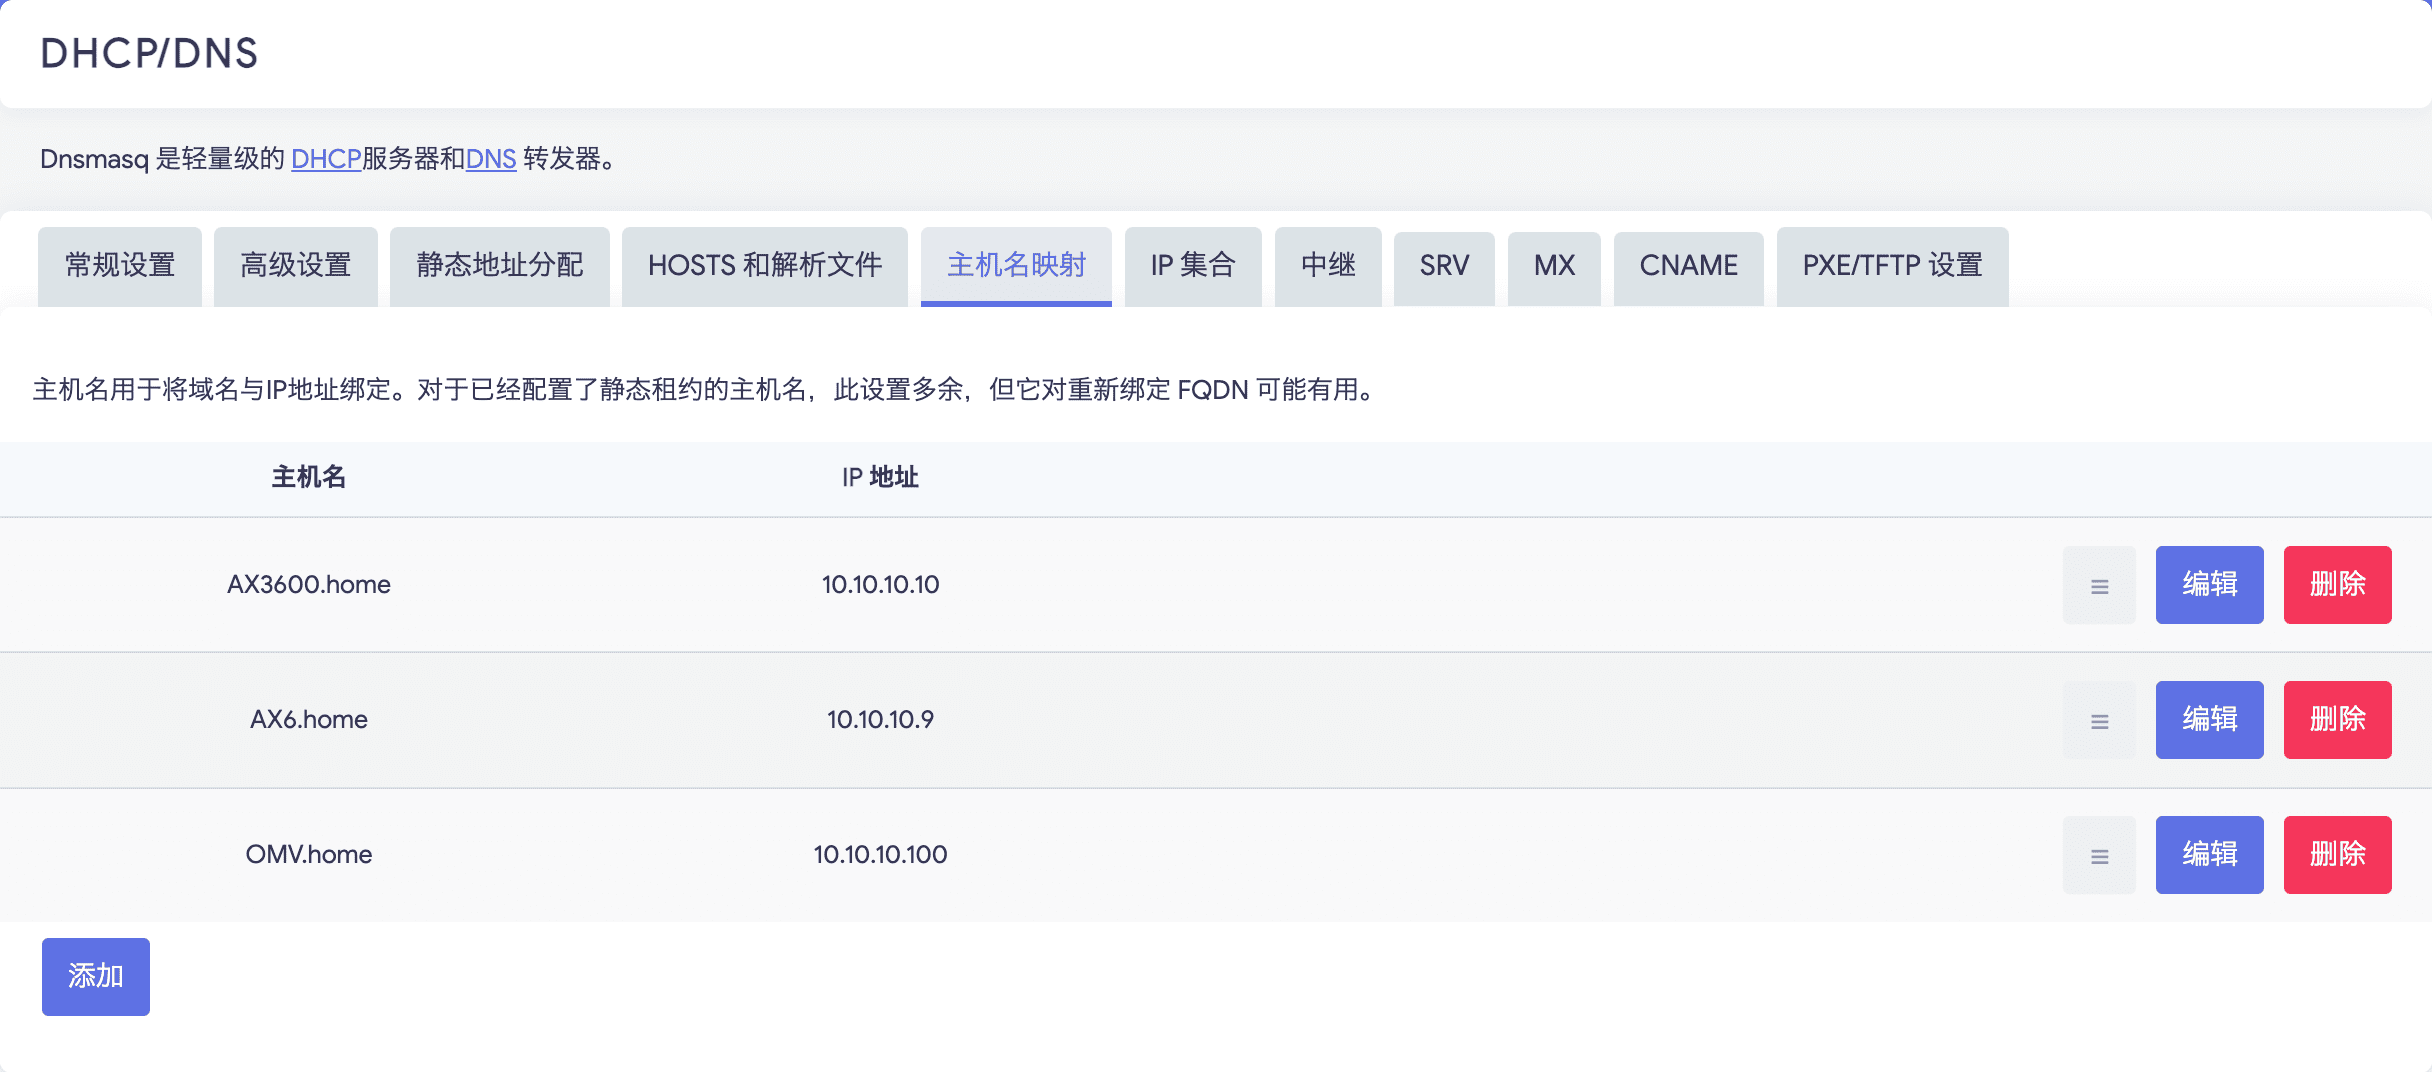
For example: primary router at 10.10.10.10, OMV server at 10.10.10.100.
1.2 Map Hostnames to Static IPs
2. Configure Clash Meta Inbound Listeners
Create one or more listeners and route .home domains to DIRECT (since .home is not an official public TLD, hijacking it locally is completely harmless).
Documentation: Configuring Clash LISTENERS
Sample configuration:
# $HOME/.clash/config.yml

# Send .home queries to your router DNS
dns:
  nameserver-policy:
    '*.home': 10.10.10.10 # or system, or dhcp://en0

# Inbound listeners
listeners:
  - name: shadowsocks-in-auto
    type: shadowsocks
    port: 8901 # Custom port, remember this for router firewall rules
    listen: 0.0.0.0
    password: chimiantiaome # Custom password, needed for client subscription
    cipher: aes-128-gcm

rules:
  - DOMAIN-SUFFIX,home,DIRECT # HOME
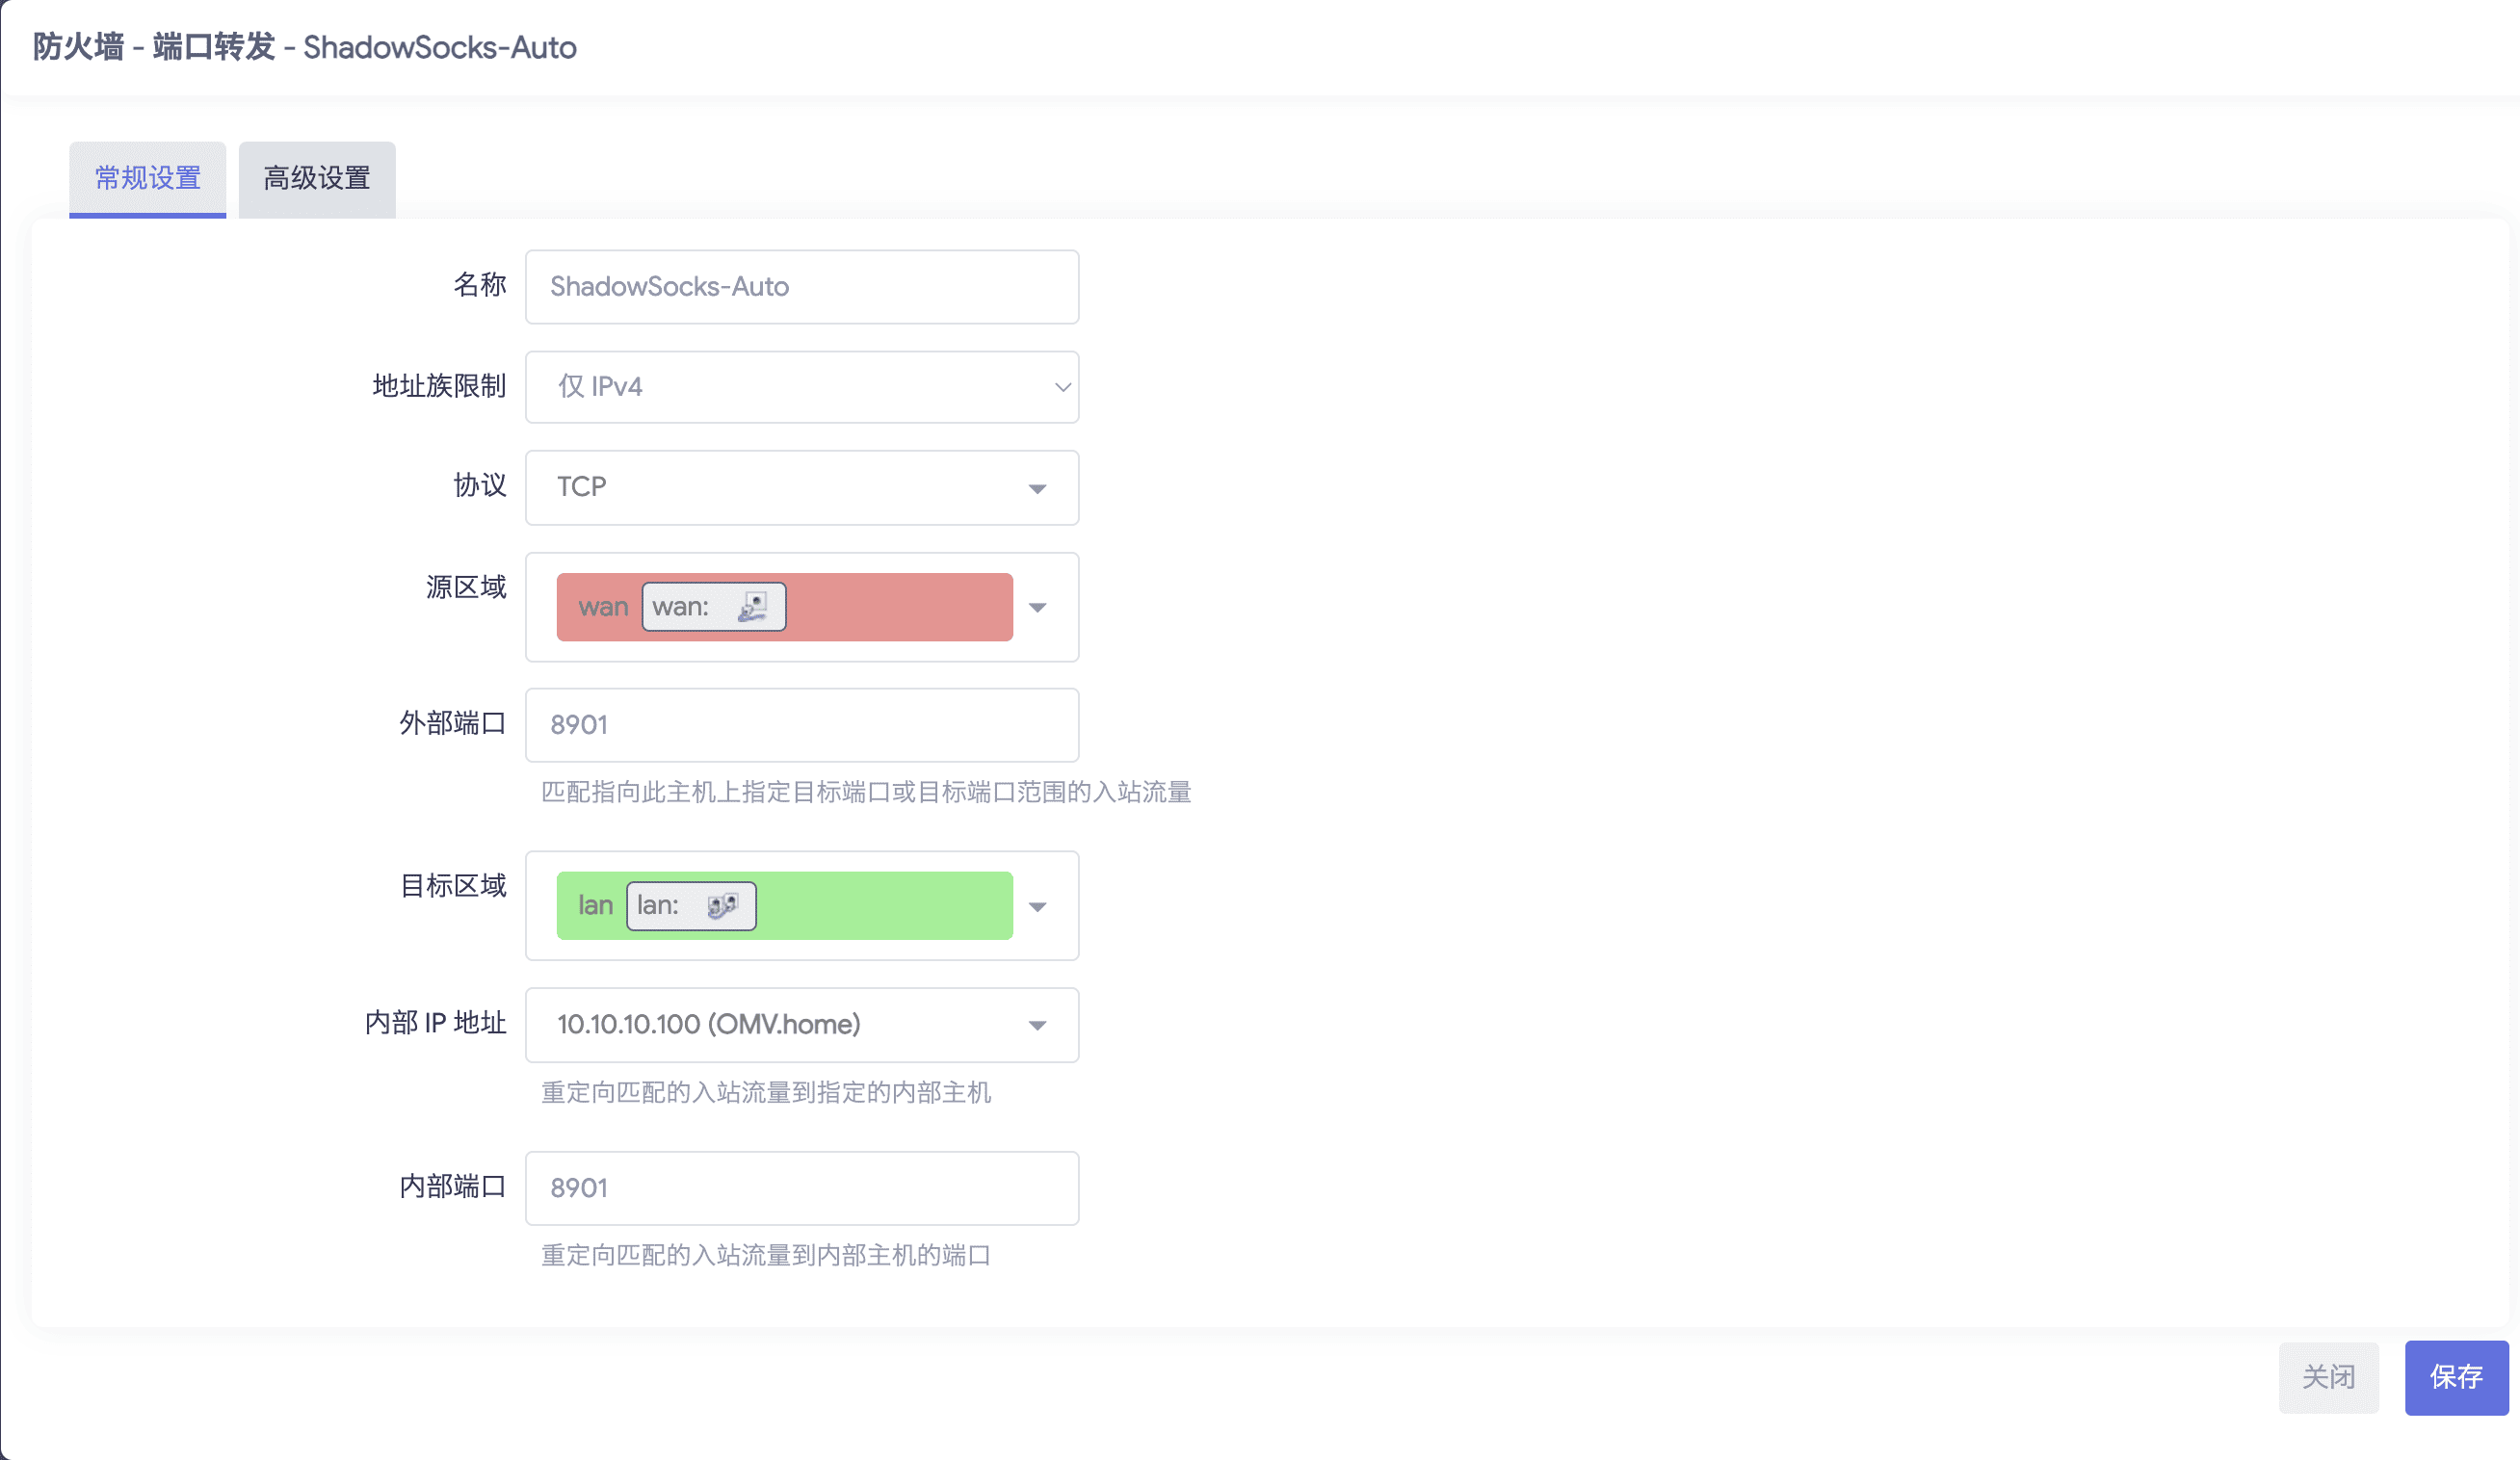
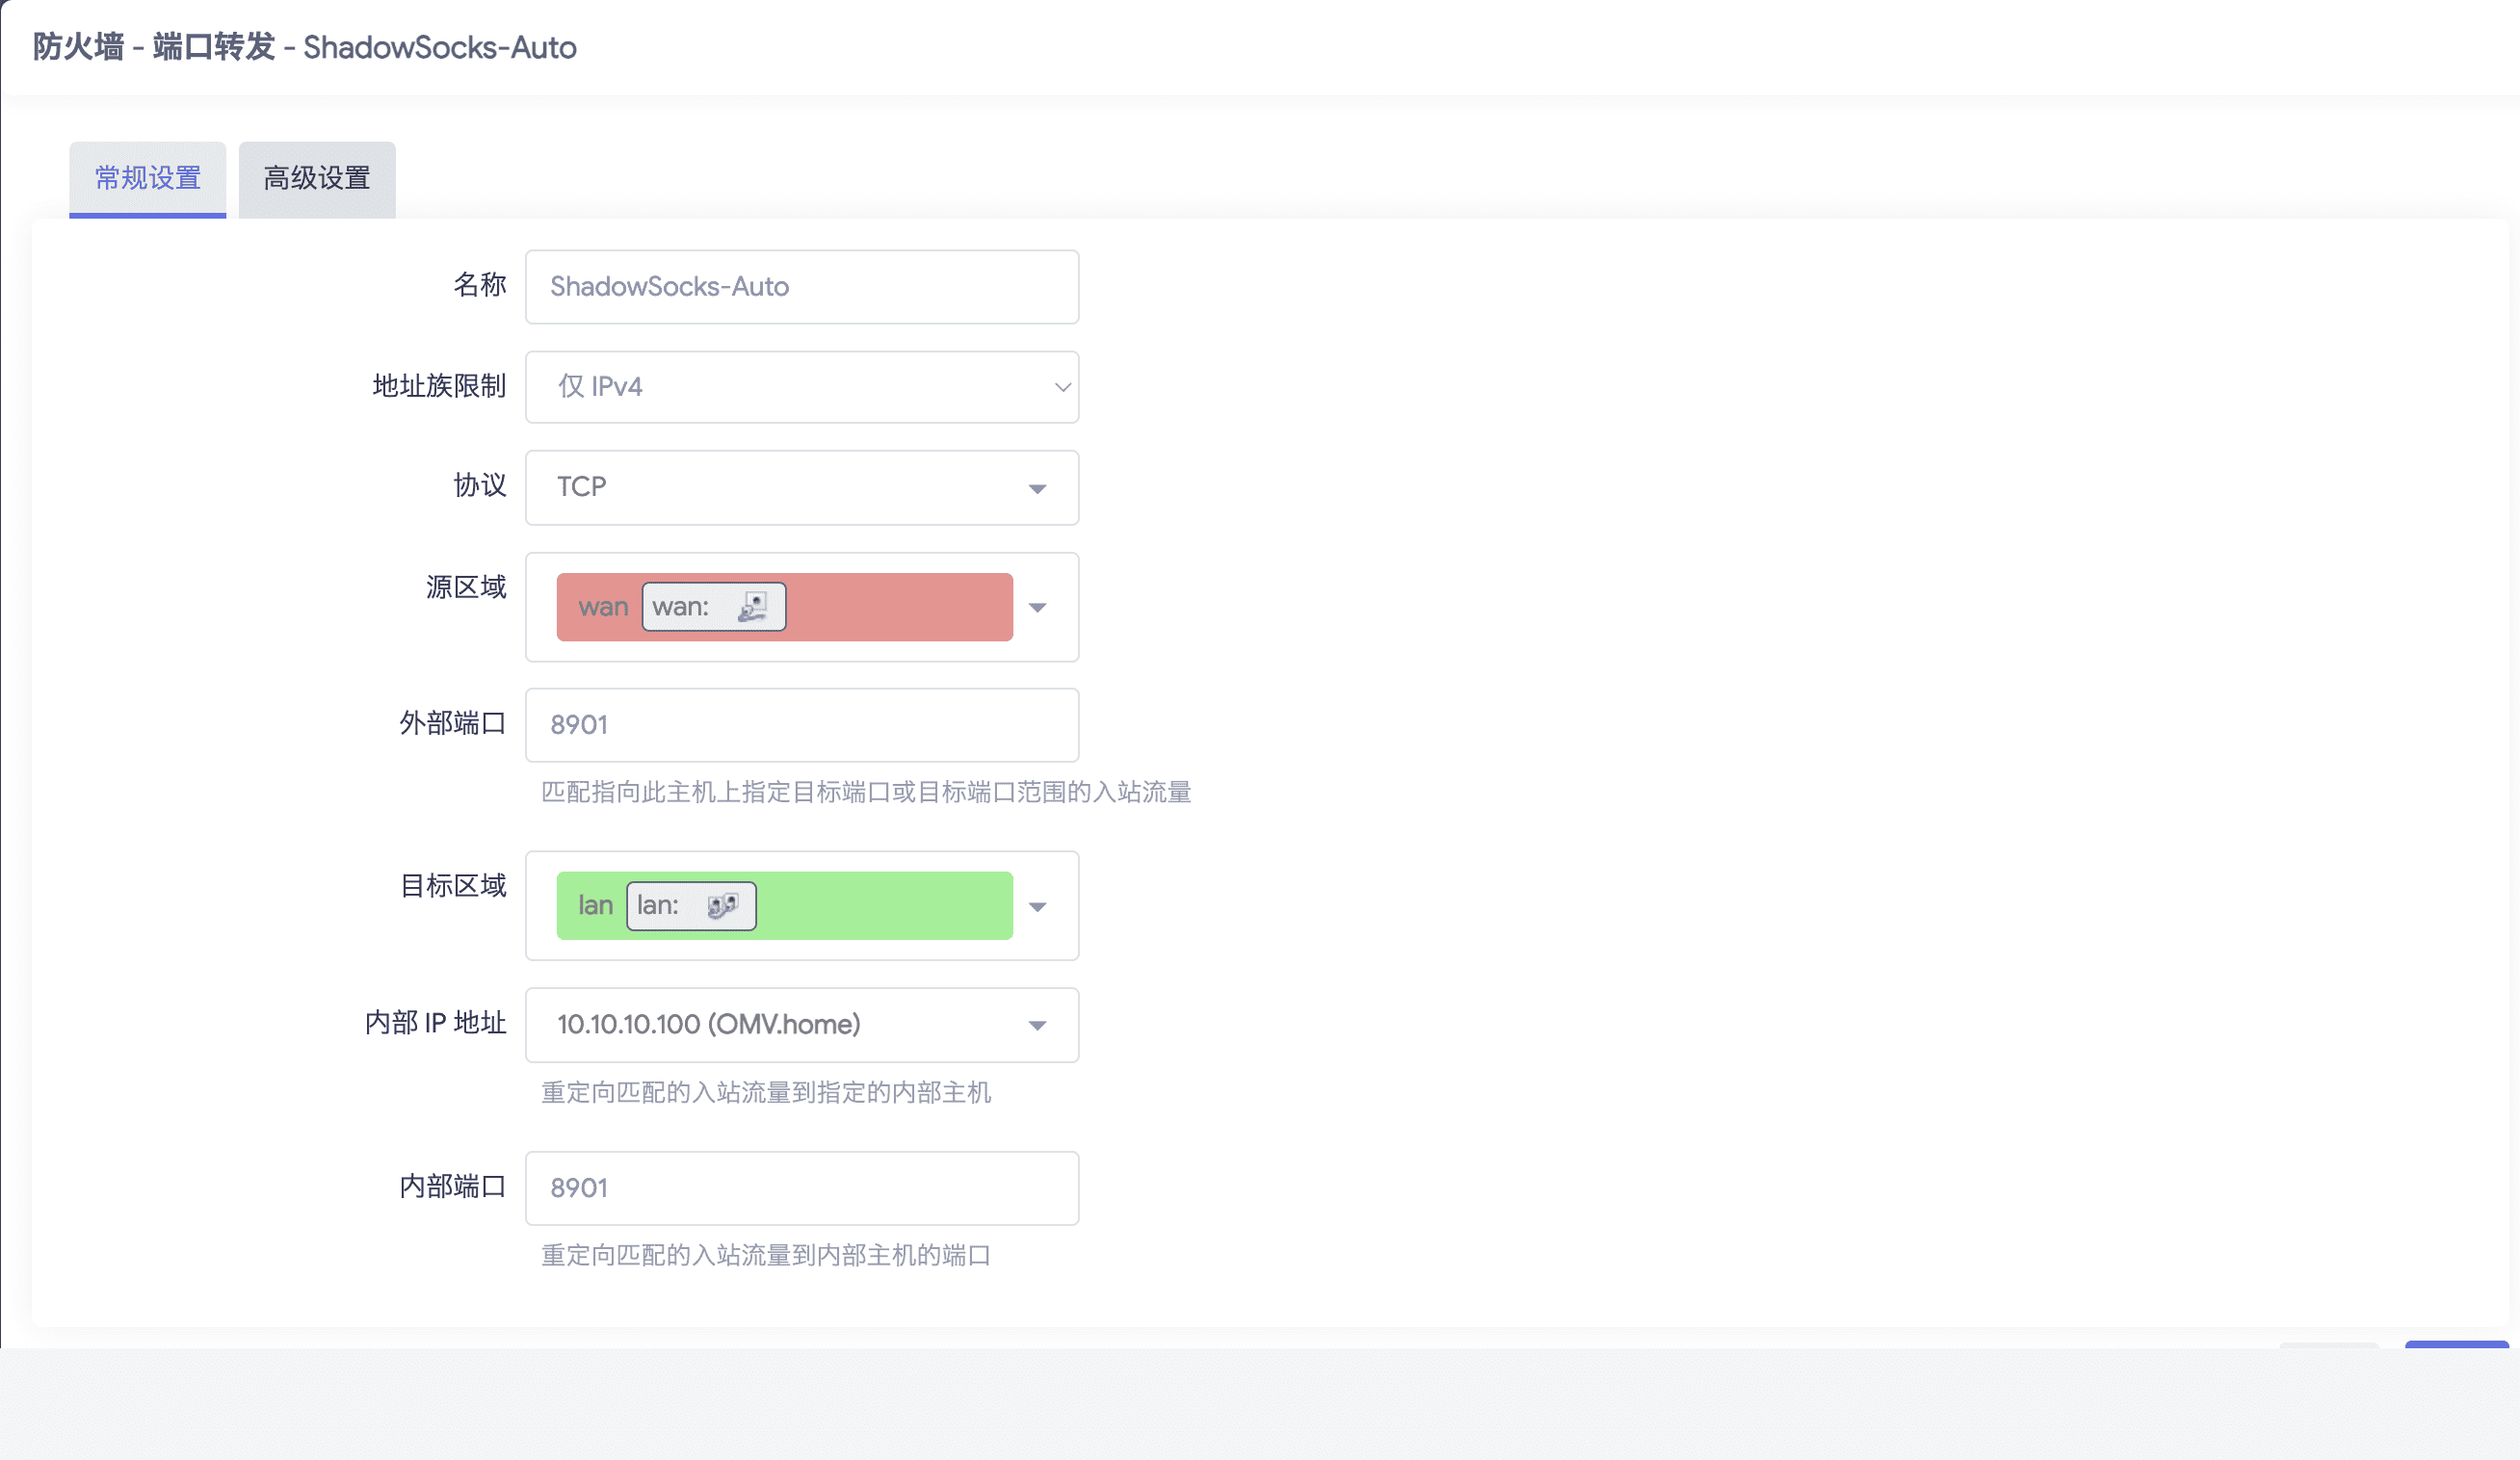
3. Add Firewall Port Forwarding on the Router
Listen on port 8901 on the router and forward that traffic to port 8901 on the internal machine running Clash:
4. Push IP and Port Info to Vercel
4.1 Deploy the Helper Endpoint
The Vercel service is a tiny endpoint I wrote to store dynamic IP/port mappings:
Once deployed, you get an API URL like https://magic.miantiao.me.
Upload the following notification script to /usr/bin/diy/dip.sh on your router:
# #!/bin/sh

# Script repository: https://github.com/miantiao-me/without-ipv4/blob/master/shell/dip.sh

# DIP

outter_ip=$1
outter_port=$2
inner_ip=$3
inner_port=$4
protocol=$5

logger -t "DIP" "[DIP] start : ${protocol}: ${outter_ip}:${outter_port} to ${inner_ip}:${inner_port}"

if [ "${outter_port}" ]; then
  logger -t "DIP" "${outter_ip}:${outter_port}"
  curl -Ss -o /dev/null -X POST \
    -H 'Content-Type: application/json' \
    -d '{"ip": "'"${outter_ip}"'", "port": "'"${outter_port}"'", "key": "'"${inner_port}"'"}' \
    "https://magic.miantiao.me/dip"
fi

logger -t "DIP" "[DIP] ${inner_port} end"
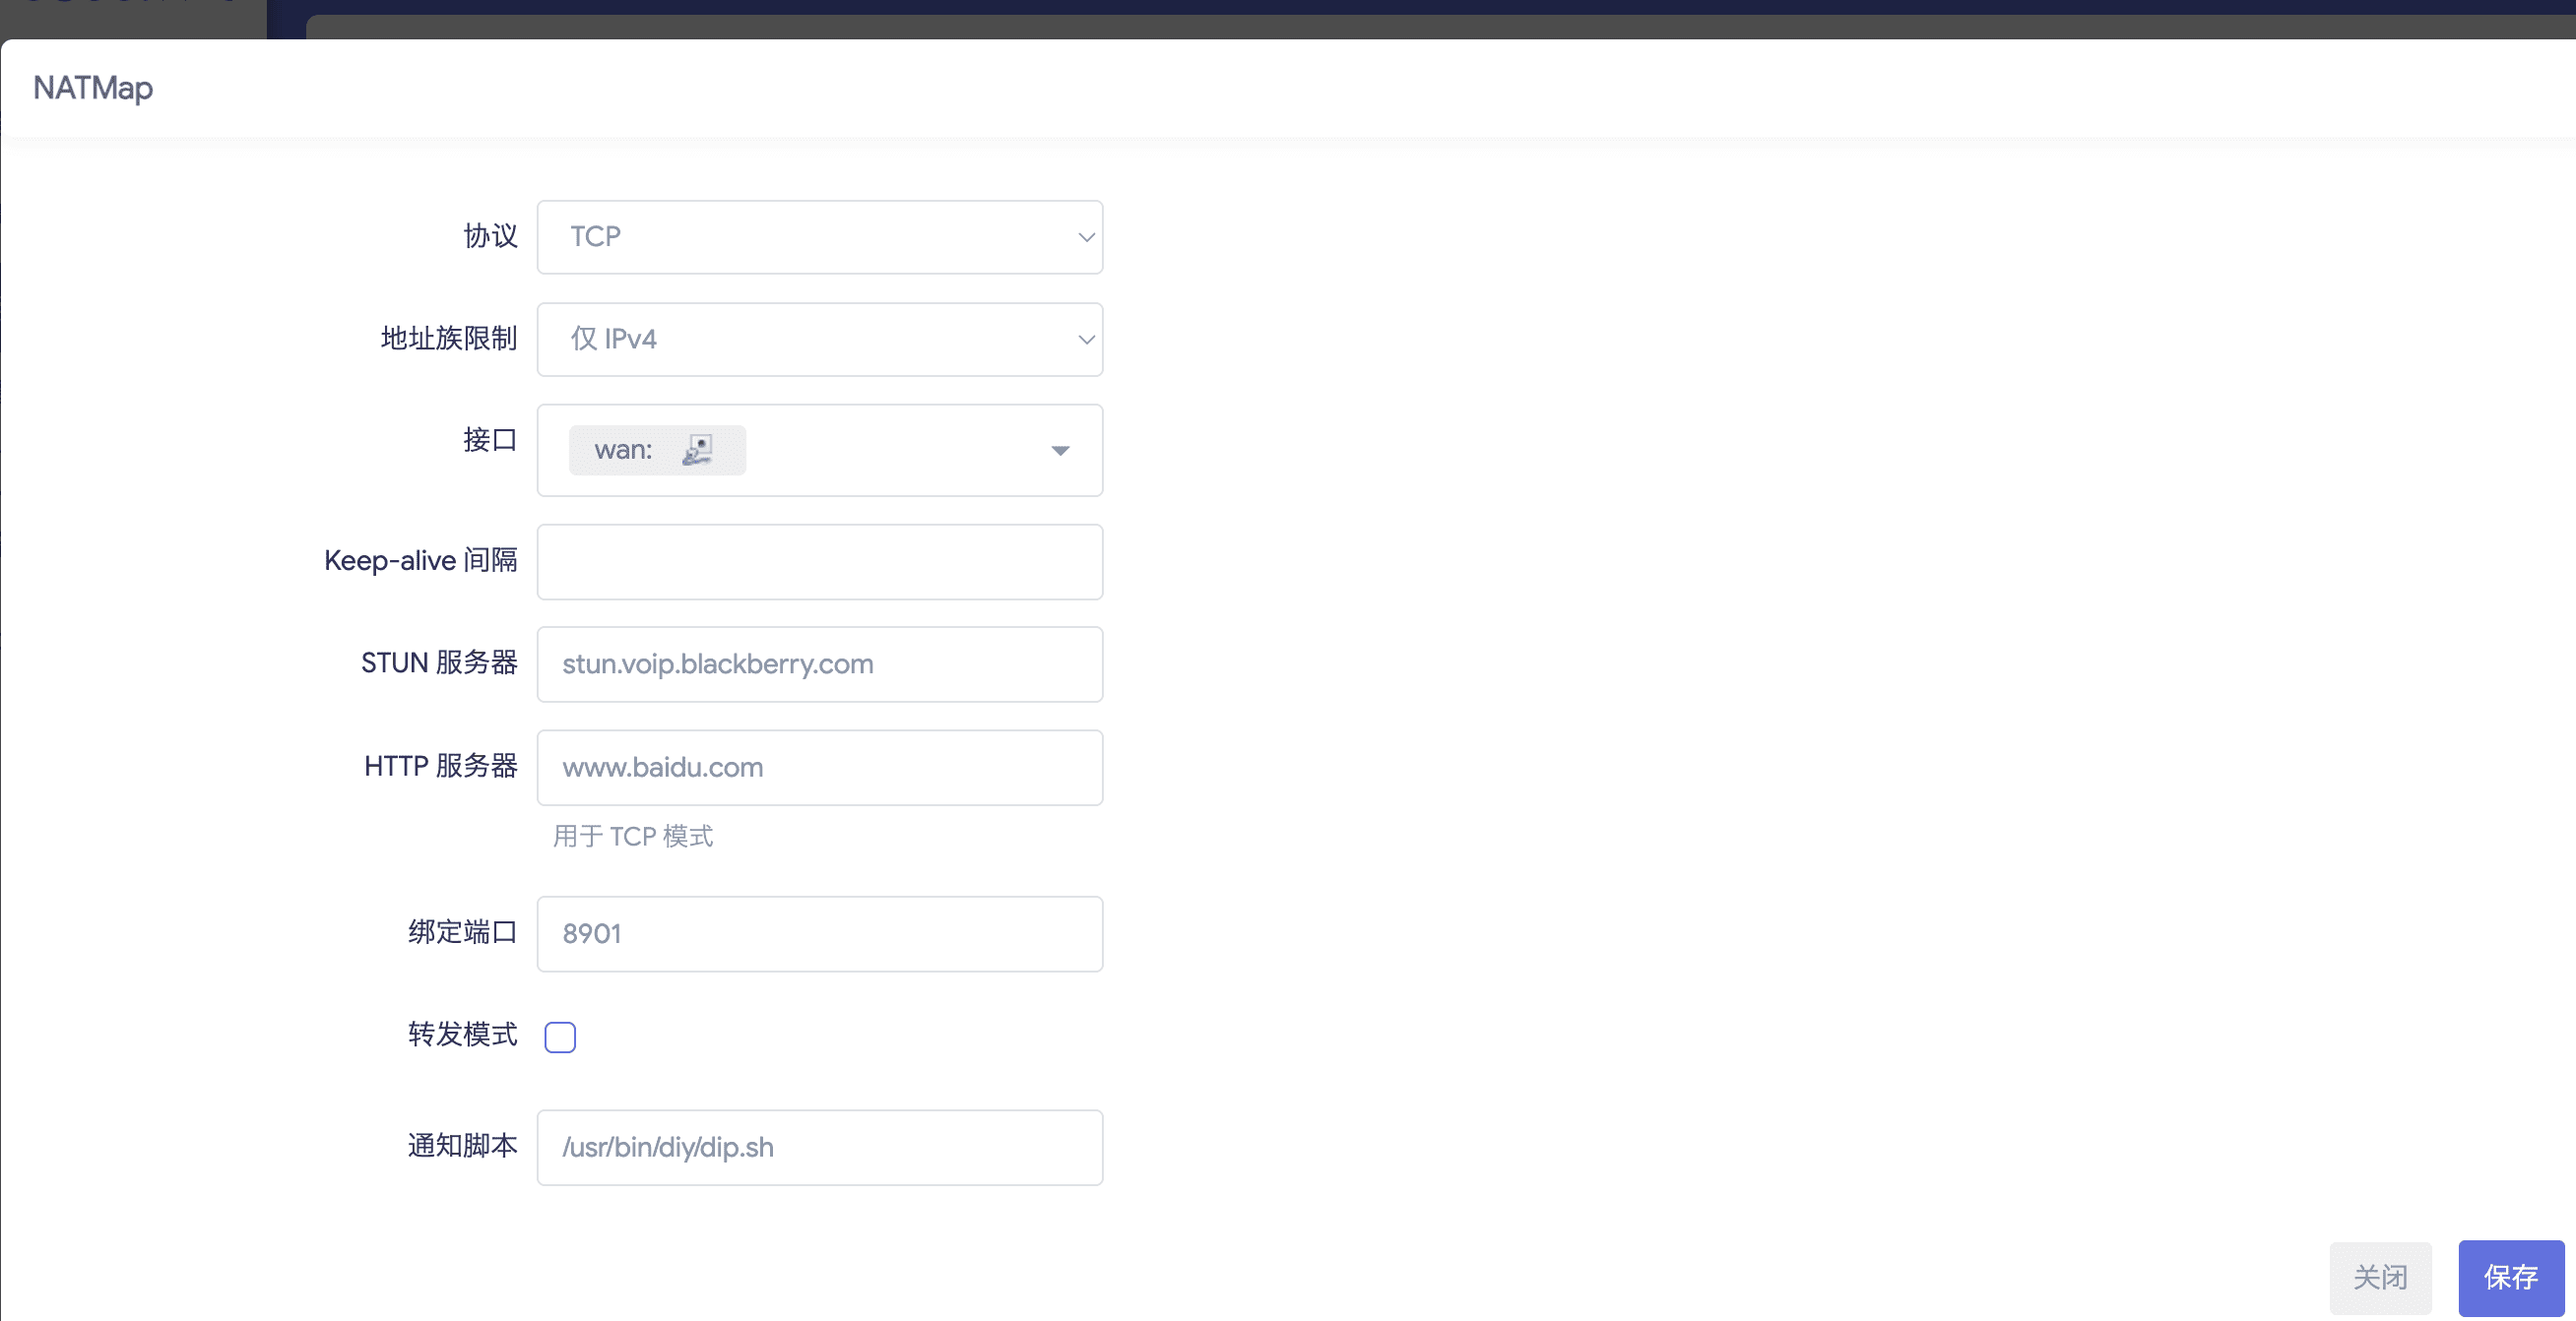
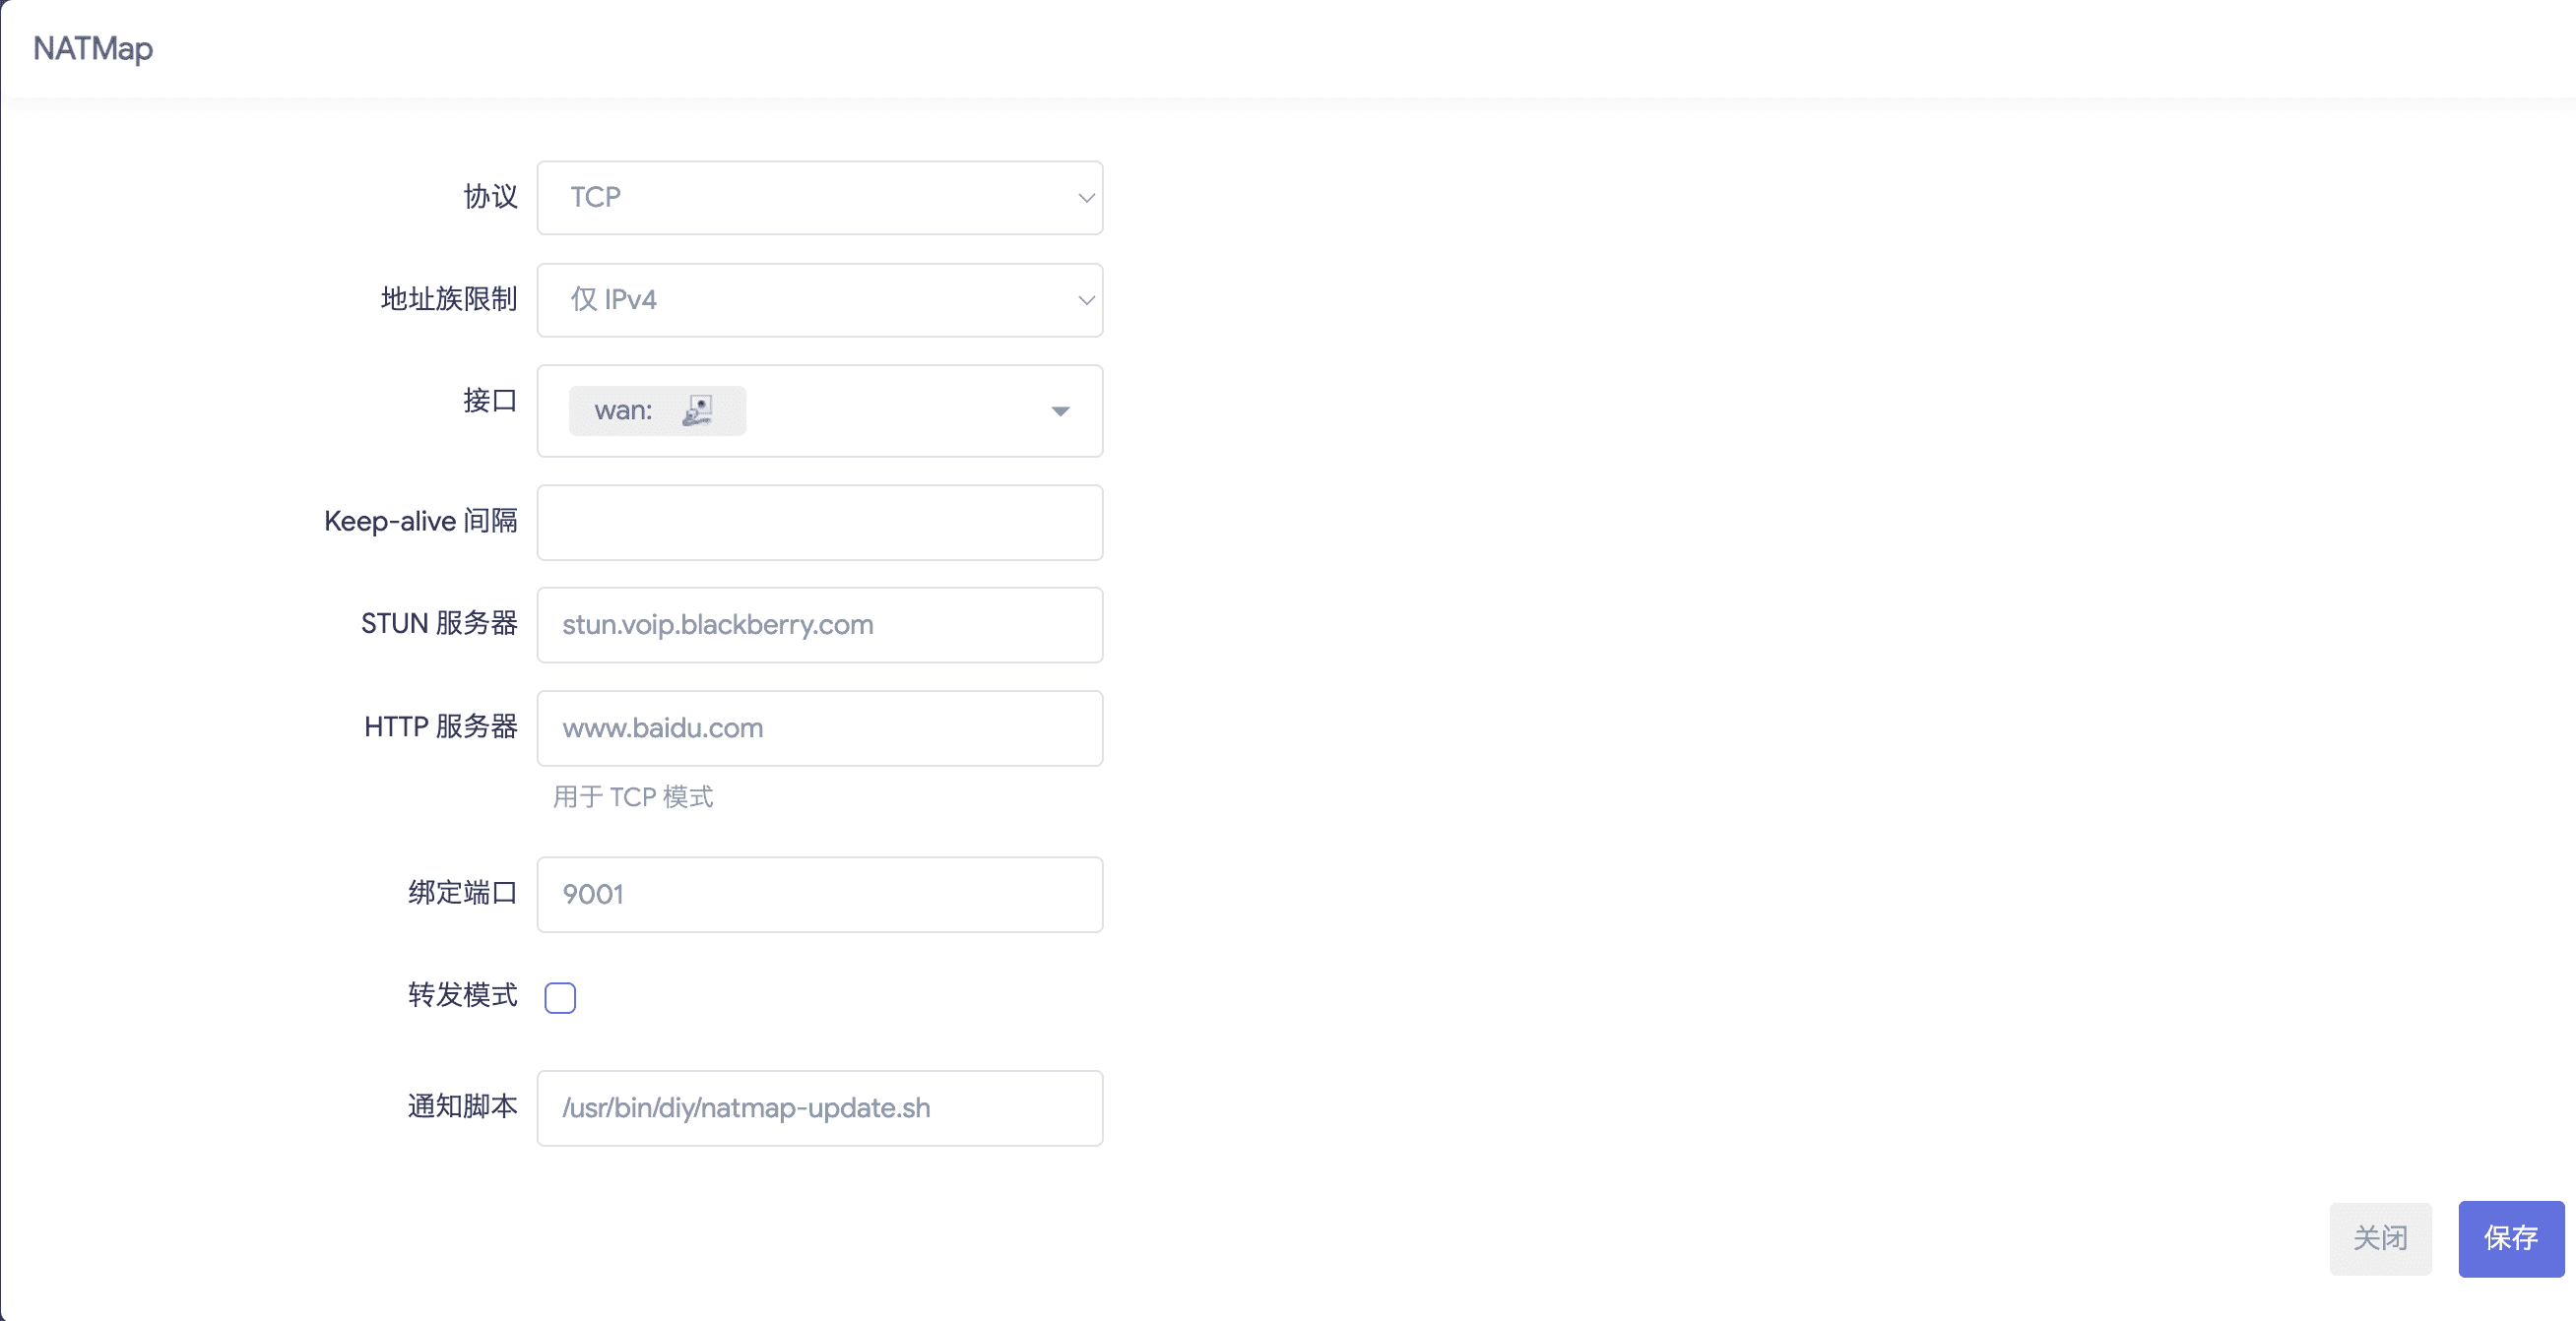
5. Configure NATMap
Install the NATMap OpenWrt package and add a hole-punching rule:
6. Verify Firewall Forwarding
7. Subscribe to the Node on Client Devices
Once the pipeline is running, subscribe to the Clash endpoint from your laptop or phone: https://magic.miantiao.me/dip?key=8901&password=chimiantiaome (make sure to use your own URL, key, and password).
8. Add Routing Rules in Your Client’s Clash
rules:
  - DOMAIN-SUFFIX,home,HOME-8901 # Match node name from the subscription
Restart Clash on your client. Now entering http://OMV.home or http://AX3600.home in your browser takes you straight to your home gear:
On iOS with Quantumult X (using custom resource parsers), the setup connects back home just as smoothly:
Scenario 3: Private Tracker (PT) Connectability and Upload Speed
The PT upload setup is similar, but doesn’t require uploading IP/port info to an external service.
1. Assign Static IPs and Hostnames (Same as Scenario 2)
2. Upload the qBittorrent Port Updater Script
Upload this script to /usr/bin/diy/natmap-update.sh on your router. Whenever NATMap punches a new port, the script updates firewall forwards, notifies qBittorrent of its new incoming port, and optionally sends a Bark notification:
#!/bin/sh

# Script repository: https://github.com/miantiao-me/without-ipv4/blob/master/shell/natmap-update.sh

# NATMap

outter_ip=$1
outter_port=$2
inner_ip=$3
inner_port=$4
protocol=$5

logger -t "NATMap" "[NATMap] start NAT : ${protocol}: ${outter_ip}:${outter_port} to ${inner_port}"

case ${inner_port} in
  # qBittorrent
  9001)
    sleep 1
    qbv4="10.10.10.100"
    qbwebport="9091"
    qbusername="mt"
    qbpassword="chimiantiaome"
    # ipv4 redirect
    uci set firewall.redirectqbv41=redirect
    uci set firewall.redirectqbv41.name='qBittorrent9091'
    uci set firewall.redirectqbv41.proto='tcp'
    uci set firewall.redirectqbv41.src='wan'
    uci set firewall.redirectqbv41.dest='lan'
    uci set firewall.redirectqbv41.target='DNAT'
    uci set firewall.redirectqbv41.src_dport="${inner_port}"
    uci set firewall.redirectqbv41.dest_ip="${qbv4}"
    uci set firewall.redirectqbv41.dest_port="${outter_port}"
    # reload
    uci commit firewall
    /etc/init.d/firewall reload > /dev/null
    sleep 3
    # update port
    qbcookie=$(\
      curl -Ssi -X POST \
        -d "username=${qbusername}&password=${qbpassword}" \
        "http://${qbv4}:${qbwebport}/api/v2/auth/login" | \
      sed -n 's/.*\(SID=.\{32\}\);.*/\1/p' )
    curl -X POST \
    -s \
    -b "${qbcookie}" \
    -d 'json={"listen_port":"'${outter_port}'"}' \
    "http://${qbv4}:${qbwebport}/api/v2/app/setPreferences"
  text="[NATMap] qBittorrent TCP Port: ${outter_ip}:${outter_port} to ${inner_port} to $(uci get firewall.redirectqbv41.dest_ip):$(uci get firewall.redirectqbv41.dest_port)"
  ;;
  *)
    text="[NATMap] not NAT: ${protocol}: ${outter_ip}:${outter_port} to ${inner_port}"
    ;;
esac

if [ "${text}" ]; then
  logger -t "NATMap" "${text}"
  # Push port notification to Bark (optional)
  curl -Ss -o /dev/null -X POST \
    -H 'Content-Type: application/json' \
    -d '{"title": "NATMap", "body": "'"${text}"'"}' \
    "https://api.day.app/BARK_KEY" # Bark API
fi

logger -t "NATMap" "[NATMap] ${inner_port} NAT end"
3. Configure NATMap for PT
Add the NATMap rule in LuCI and point it to the update script above.
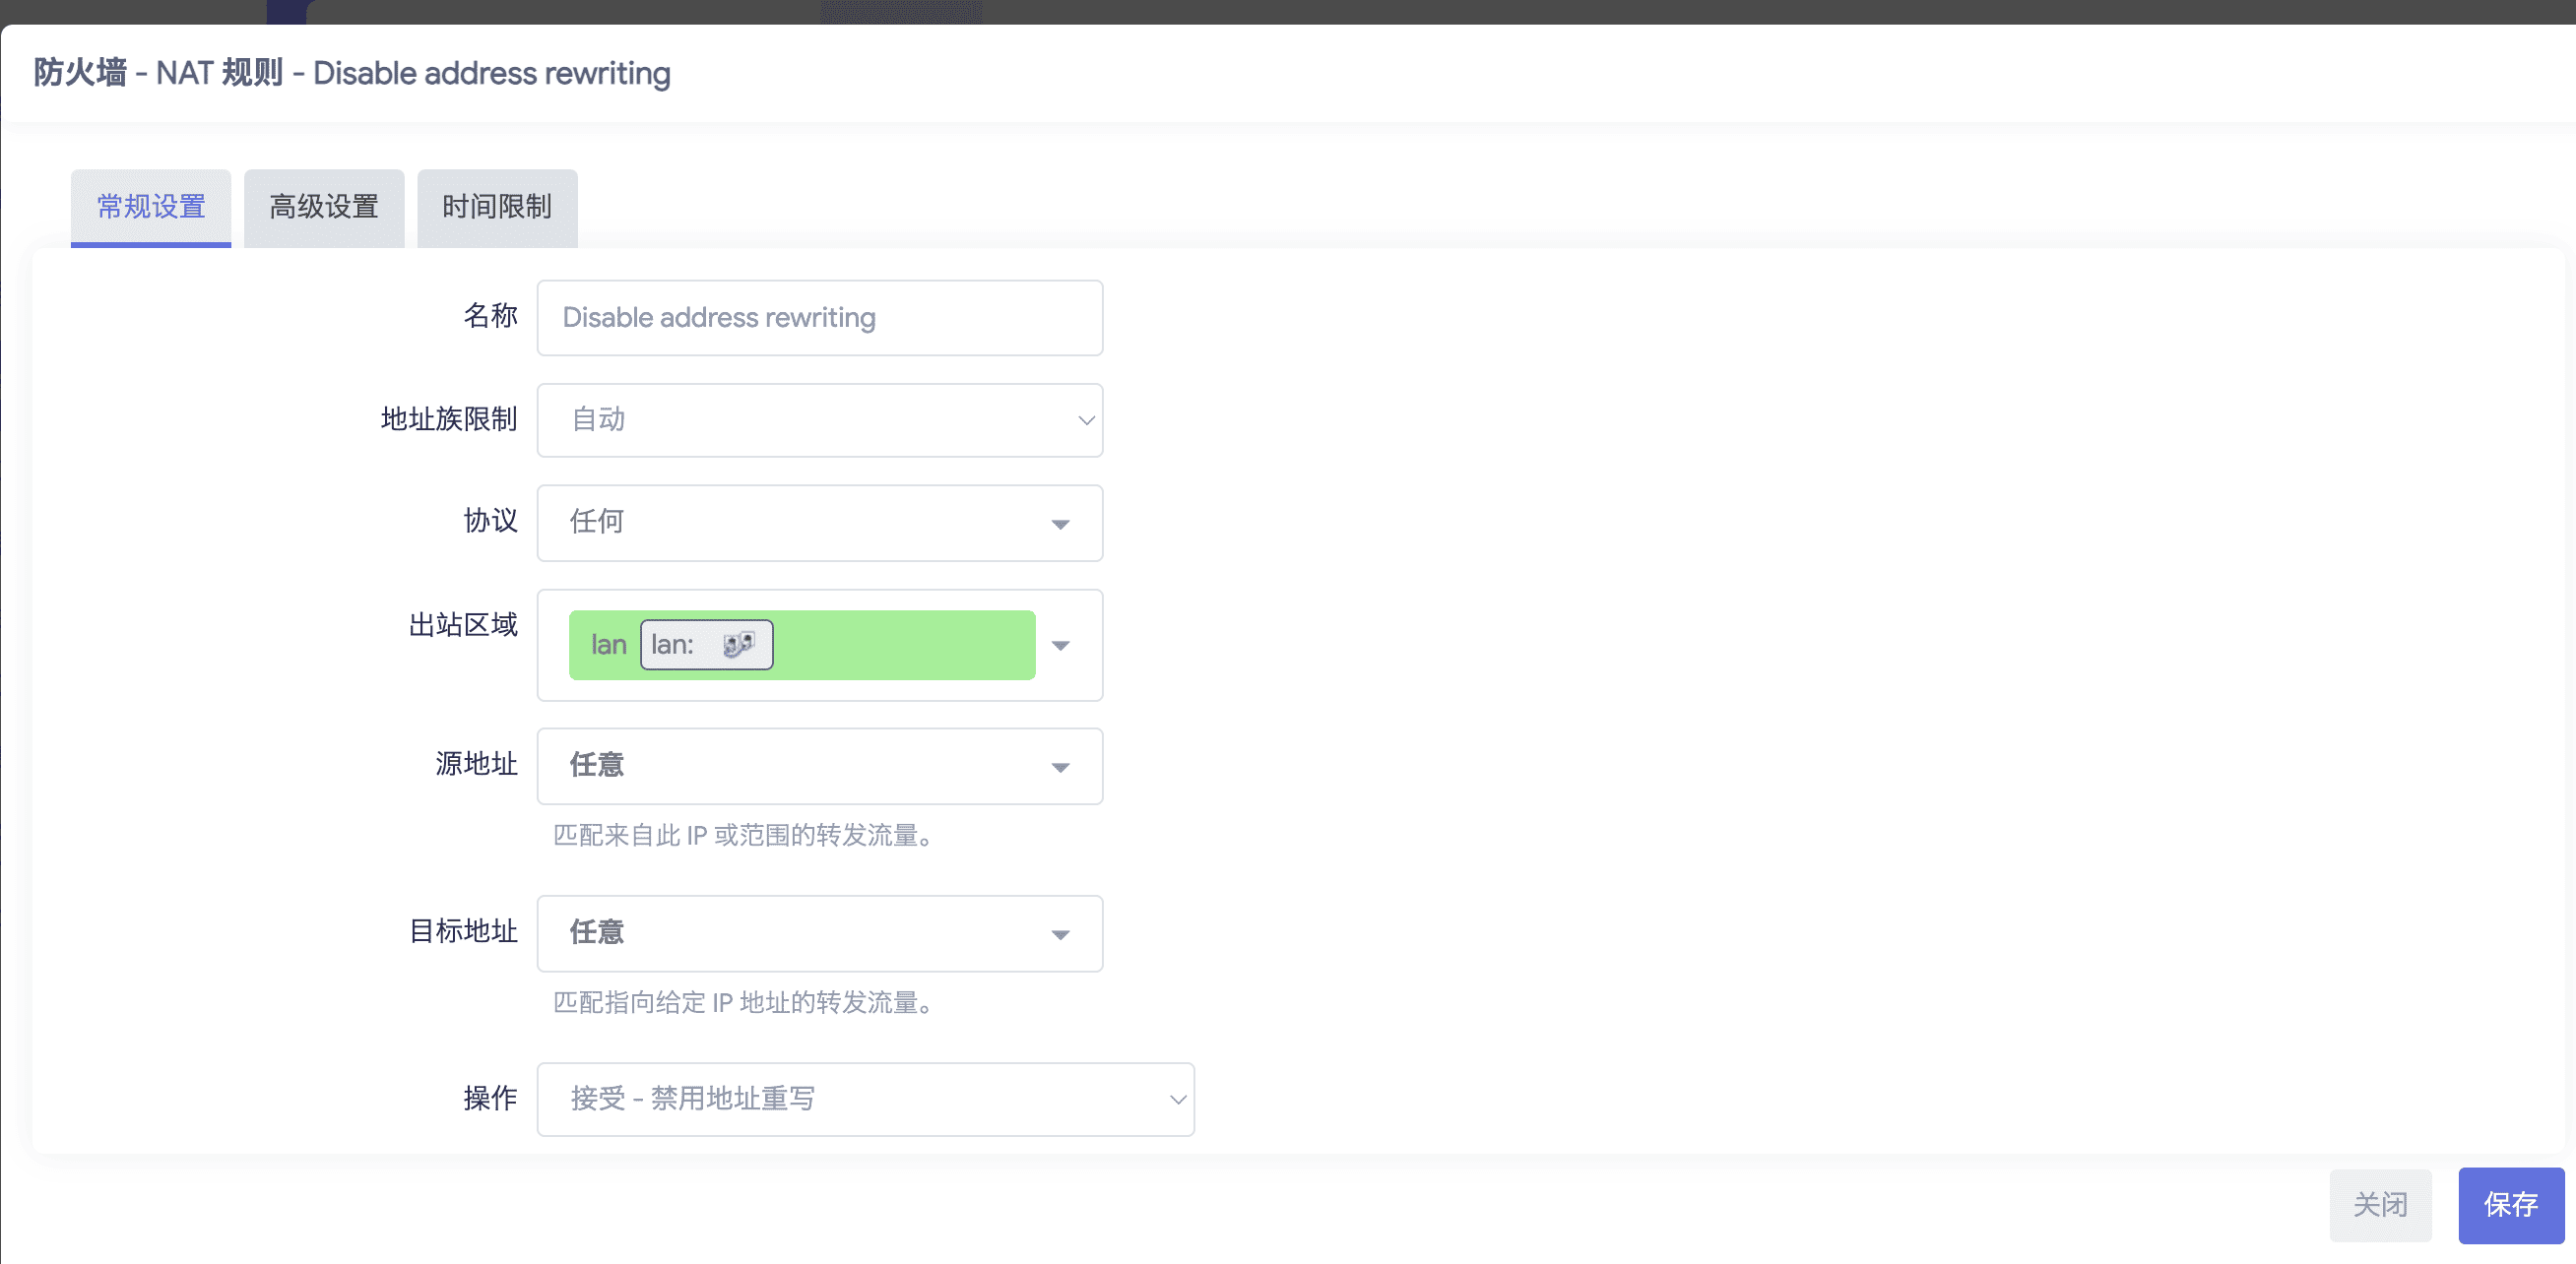
4. Disable SNAT Address Rewriting in Firewall
If you leave this untouched, qBittorrent will see all inbound peer traffic originating from the router’s IP rather than the remote peer’s public IP, breaking peer connection tracking.
Results
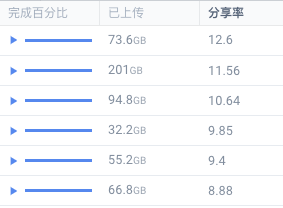
As you can see, maintaining a healthy seeding ratio without public IPv4 becomes effortless:
This setup does involve a fair amount of tinkering. If you hit snags or want to compare notes, feel free to reach out.